[aru_30][aru_7]
虚拟环境即一个独立的开发空间,避免整体的开发环境混乱
虚拟环境有venv、pipenv、poetry、conda等
conda就暂时不用了,有点臃肿,自己目前不想安装anaconda、miniconda等
自己在软件打包的时候使用虚拟环境,其他的情况下只保留一到两个虚拟环境供测试,且打包完的虚拟环境记得及时的删除
最后还是选择了miniconda[aru_40]
在老的台式机上试了一试,觉得还行,第三方库自动的下载到了D盘,创建的虚拟环境也是在D盘中,不占用C盘的空间
我目前犹豫的地方是,自己的笔记本上是不是安装一个原生的python,就是不需要虚拟环境的python
在这里记录一下miniconda的环境配置
暂定在自己的电脑上安装python3.10.11版本,
这里说明一下,一定要先在自己的电脑上安装好一个python,并且安装一个库(numpy)并且在pycharm中创建一个项目,之后关闭这个项目,在重新安装miniconda,这时候在配置项目的解释器的时候就不会出现找不到解释器的情况了
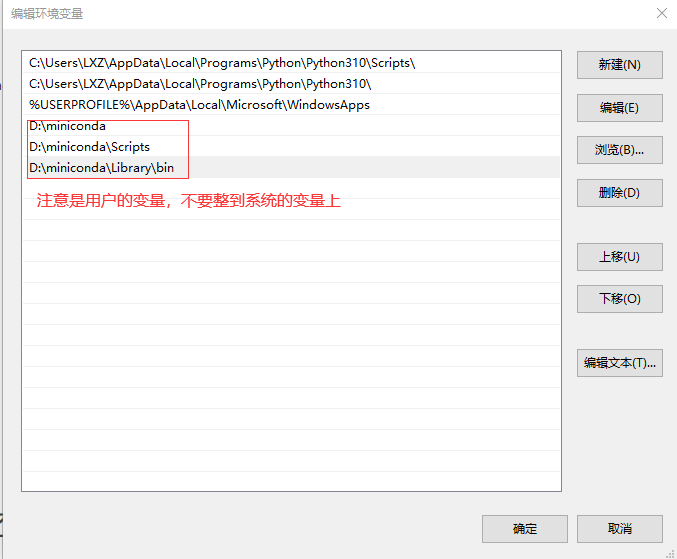
解释一下用户变量和系统变量
用户变量就是对当前的使用者有效,即仅为自己安装使用
相应的系统变量就是只要使用了这个系统,就有效,即为所有人安装使用
自己电脑python的默认安装位置

C:\Users\LXZ\AppData\Local\Programs\Python\Python310
2.0 miniconda的安装+配置
-
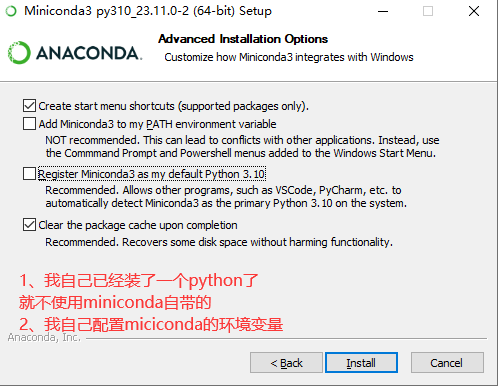
安装的时候,选择仅为自己安装

-
环境变量我自己稍后配置+配置好国内的镜像源

- 配置miniconda的环境

2.1 配置镜像源
-
百度搜索“清华镜像源”----找到anaconda旁边的小问号,点击跳转教程
-
输入 conda config --set show_channel_urls yes -
将图中的数据复制到文件中,看教程就行
配置文件改为以下的,包含镜像源、虚拟环境安装位置、第三方库的安装位置
 channels:
   - defaults
 show_channel_urls: true
 default_channels:
   - https://mirrors.tuna.tsinghua.edu.cn/anaconda/pkgs/main
   - https://mirrors.tuna.tsinghua.edu.cn/anaconda/pkgs/r
   - https://mirrors.tuna.tsinghua.edu.cn/anaconda/pkgs/msys2
 custom_channels:
   conda-forge: https://mirrors.tuna.tsinghua.edu.cn/anaconda/cloud
   msys2: https://mirrors.tuna.tsinghua.edu.cn/anaconda/cloud
   bioconda: https://mirrors.tuna.tsinghua.edu.cn/anaconda/cloud
   menpo: https://mirrors.tuna.tsinghua.edu.cn/anaconda/cloud
   pytorch: https://mirrors.tuna.tsinghua.edu.cn/anaconda/cloud
   pytorch-lts: https://mirrors.tuna.tsinghua.edu.cn/anaconda/cloud
   simpleitk: https://mirrors.tuna.tsinghua.edu.cn/anaconda/cloud
   deepmodeling: https://mirrors.tuna.tsinghua.edu.cn/anaconda/cloud/
 envs_dirs:
   - D:\miniconda\envs
   - C:\Users\LXZ\.conda\envs
   - C:\Users\LXZ\AppData\Local\conda\conda\envs
 pkgs_dirs:
   - D:\miniconda\pkgs
   - C:\Users\LXZ\.conda\pkgs
   - C:\Users\LXZ\AppData\Local\conda\conda\pkgs
2.2 conda的一些命令
-
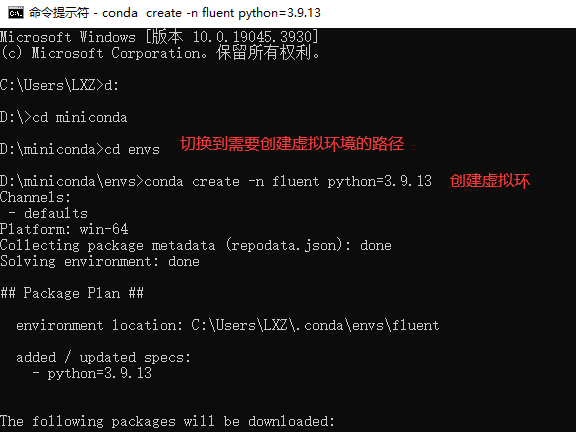
创建虚拟环境,且环境的名称为fluent,并且安装了一个版本号为3.9.13的python
conda create -n fluent python=3.9.13

-
激活虚拟环境,fluent是虚拟环境名
conda activate fluent
-
查看安装了多少虚拟环境
conda env list
-
查看虚拟环境的安装位置,第三方库的安装位置
conda config --show
-
删除虚拟环境
conda remove -n fluent --all
删除虚拟环境后在去虚拟环境的路径下把残留的东西全都删掉

-
设置python 镜像源--我选择的是清华的镜像源
https://pypi.tuna.tsinghua.edu.cn/simple
2.3 删除pycharm多余的解释器
首先在pycharm中的右下角找到解释器设置,打开后如图所示,点击全部显示

点击减号,删除当前解释器,可以看到图中的样子
[斜眼笑]
本文作者为lxz,转载请注明。
